Getting Hands-On with HotSpot
Rediscovering My Java Roots
Recently, I found myself revisiting Bill Venners' classic book Inside the Java Virtual Machine. I started my programming journey as a Java developer in the late 90s and spent about 15 years deeply immersed in the Java ecosystem. Those were fascinating times - watching Java evolve from its early versions through the enterprise boom, and seeing how the JVM became a platform for multiple programming languages.
The book sparked something in me. Despite having moved on to other technologies, platforms and roles over the years, I felt drawn back to the intricate world of Java - not just to write Java code again, but to look under the bonnet at the very engine that powers it: the HotSpot VM.
I decided to embark on a hands-on journey with OpenJDK, the open-source implementation of the Java Platform. This post documents my setup process using CLion as my IDE of choice. If you're considering exploring OpenJDK's internals yourself, hopefully this guide will save you some time and frustration.
Why CLion for HotSpot?
While most Java developers are familiar with IDEs like IntelliJ IDEA, Eclipse, or VSCode, exploring the HotSpot VM requires diving into its underlying C++ codebase. I chose JetBrains CLion as it is the one most familar to me for C/C++ development.
HotSpot's core components - the JIT compilers, garbage collectors, bootstrap class loading mechanism, and runtime services - are all implemented in C++. The ability to step through this native code while debugging the JVM's inner workings was a key factor in my decision.
I also referred to this helpful JetBrains blog post which is a few years old and pre-dates the CLion native Makefile support feature, which has been available for some time now. This is my attempt to update that post, in essence.
My Development Environment
Here's what I'm working with:
Hardware
- Machine: Lenovo ThinkPad T480
- Processor: Intel® Core™ i7-8650U (8 cores)
- Memory: 32GB RAM
OpenJDK's C++ Development Style
Before we dive into the setup process, it's worth understanding the unique C++ development style employed by the OpenJDK team.
By no means am I a seasoned C++ engineer, and if like me, you're coming at things from an understanding of more modern C++ codebases (std::unique_ptr et al), HotSpot's approach might initially seem unconventional:
Key Characteristics of HotSpot's C++ Style
-
Conservative Language Usage: HotSpot predates modern C++ standards and uses a subset of C++ features. You'll find limited use of templates or STL containers. Also Exceptions are verboten, which is interesting given the Java language exception model.
-
Memory Management: Rather than using smart pointers, HotSpot implements its own memory management system.
-
Object-Oriented Design with a Twist: While HotSpot uses classes and inheritance, it often employs a more C-like approach to polymorphism.
-
Platform Abstraction: The codebase contains numerous platform-specific implementations encapsulated behind common interfaces, allowing the JVM to run consistently across different operating systems and architectures.
-
Extensive Use of Macros: Preprocessor macros are used extensively for configuration, debugging, and even some code generation tasks.
I'll be attempting to familiarise myself with these patterns to ease my journey through the codebase.
Ok, now, let's set up our CLion dev environment.
Setting Up the OpenJDK Build Environment
Prerequisites
Before configuring OpenJDK, I needed to set up a couple of dependencies:
GoogleTest
GoogleTest is used for unit testing C++ code in OpenJDK. To install it:
git clone -b v1.14.0 https://github.com/google/googletest
JTReg
JTReg is the Java Regression Test Harness used for running OpenJDK's test suite:
wget https://ci.adoptium.net/view/Dependencies/job/dependency_pipeline/lastSuccessfulBuild/artifact/jtreg/jtreg-7.5.1+1.tar.gz
tar xvf jtreg-7.5.1+1.tar.gz
In this example I'm grabbing a recent build.
Configuring OpenJDK
With the dependencies in place, I ran the configuration script:
bash configure --with-jtreg=/path/to/jtreg --with-gtest=/path/to/googletest --enable-debug
Make sure to replace /path/to/jtreg and /path/to/googletest with your actual installation paths.
Setting Up CLion for OpenJDK Development
Initial Project Setup
Open the JDK directory as a project in CLion.
My first attempt to build using the default settings didn't go well:
====================[ Build | all ]=============================================
make --jobs=6 all
Error: 'make -jN' is not supported, use 'make JOBS=N'
/home/altair/dev/projects/java/jdk/make/PreInit.gmk:82: *** Cannot continue.  Stop.

Process finished with exit code 2
This is because OpenJDK's build system doesn't support the standard -jN syntax for parallel builds. Instead, it uses JOBS=N.
Fixing the Build Configuration
To address this, I made the following changes:
- Go to
File > Settings > Build, Execution, Deployment > Makefile - Update
Build optionstoJOBS=6(or adjust to match your CPU core count) - Set
Build targettoimages
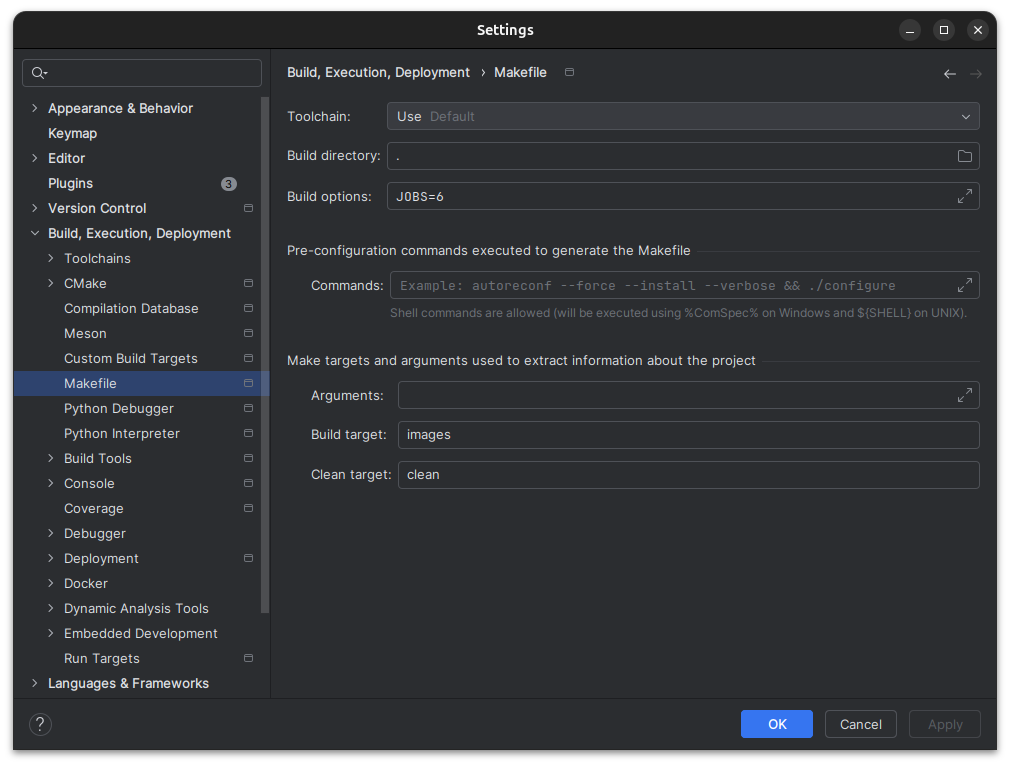
After making these changes, the project built successfully with Build > Project.
Running GTests
To verify the setup, I ran the GoogleTest suite within CLion by building the test-gtest run configuration. The entire suite took about a minute to run, with output similar to:
Test summary
==============================
   TEST                                              TOTAL  PASS  FAIL ERROR  SKIP
   gtest:all/server                                   1127  1112     0     0    15
==============================
TEST SUCCESS
Setting Up Debugging
Debugging the JVM comes with its own set of challenges. Here's how I configured CLion for debugging OpenJDK:
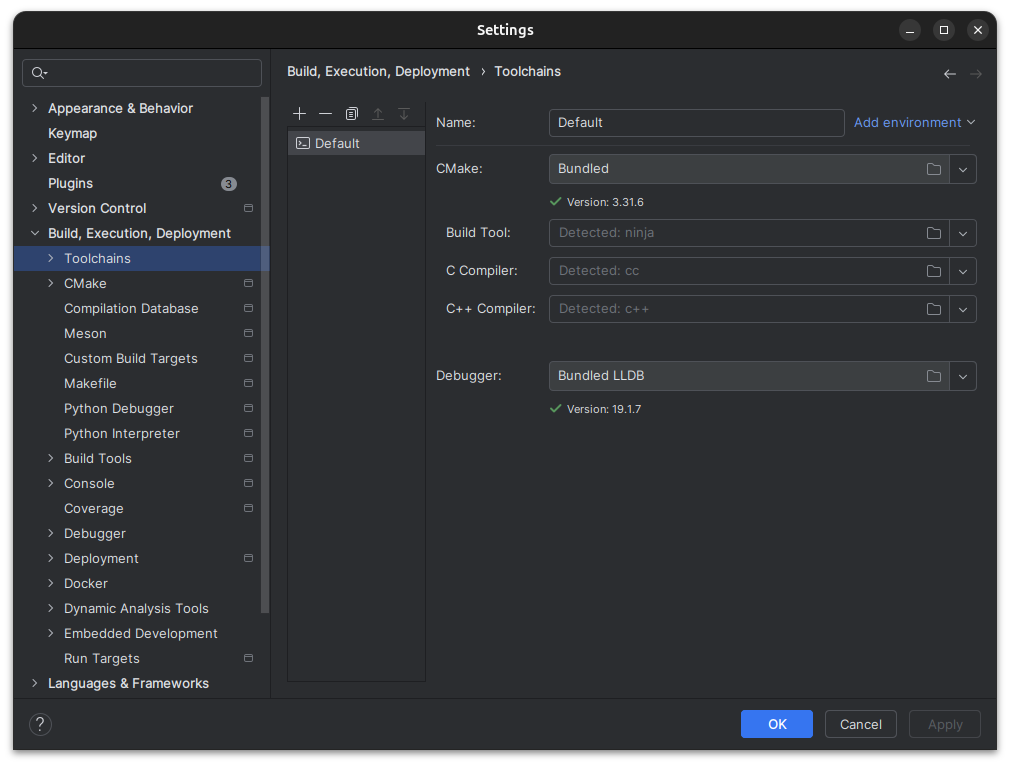
Configuring LLDB
- Go to
File > Settings > Build, Execution, Deployment > Toolchains - Set
DebuggertoBundled LLDB
LLDB Configuration Files
To handle the JVM's intentional signal usage (which can confuse debuggers), I added two configuration files:
- In my home directory (
~/.lldbinit):
settings set target.load-cwd-lldbinit true
This enables project-specific LLDB configuration files.
- In the JDK project root (
.lldbinit):
br set -n main -o true -G true -C "pro hand -p true -s false SIGSEGV SIGBUS"
This command sets a breakpoint at main and configures LLDB to pass SIGSEGV and SIGBUS signals to the process without stopping. This is crucial because the JVM intentionally triggers these signals for certain operations.
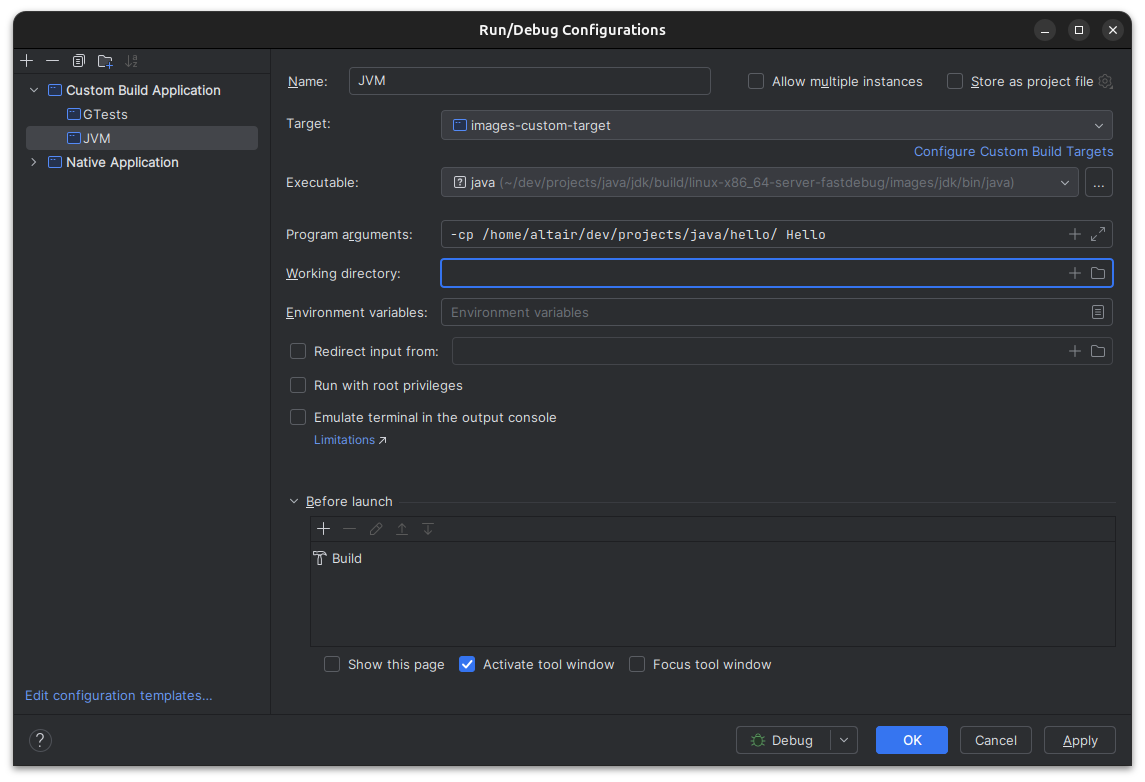
Creating a Debug Configuration
Finally, I created a custom debug configuration in CLion, as shown below:
What's Next?
With my development environment set up, I'm ready to explore the JVM internals. I'm particularly interested in diving into the HotSpot compiler, garbage collection algorithms, and the class loading mechanism. Having spent so many years working with Java applications, it's fascinating to now peek behind the curtain and understand what's happening at a deeper level.
Using CLion's C++ navigation and debugging capabilities, I can now trace through the native implementation of Java features I've used for years but never fully understood at the implementation level. It's like finally getting to see how the magic trick works after watching it performed hundreds of times.
If you're on a similar journey of rediscovery or just curious about how Java works under the hood/bonnet, I hope this guide helps you get started. There's something uniquely satisfying about being able to trace through the execution of code that powers millions of applications worldwide.